Windows 11 Home & Pro (Activation Guide)
Here we'll show you how to reinstall, or fresh install Windows 11 with USB flash drive. To install according to our instructions, you should have access to a USB flash drive of at least 8 GB.
When you only need to activate Windows 11 and don't need to re-install or reinstall, you can click here for product key activation instructions.
However, if you do not have Windows 11 installed on your computer, you will need to do a fresh installation, simple step-by-step instructions are below.
INSTALL WINDOWS 11 WITH USB DRIVE
Here we will go through how to reinstall Windows 11 with USB drive. Make sure you have a USB drive of at least 8 GB and that it doesn't have the information you want to save because it will be deleted. We always recommend backing up all files on an external hard drive or cloud storage service.
STEP 1: Start on the Microsoft download page
Click on the link below to go to Microsoft's official downloads page.
Windows 11 (Click here!)
STEP 2: Download Media Creation Tool

STEP 3: Open the tool
Run the program once it’s finished downloading.
STEP 4: Accept the license conditions

STEP 5: Select the language for installation

STEP 6: Install on USB drive

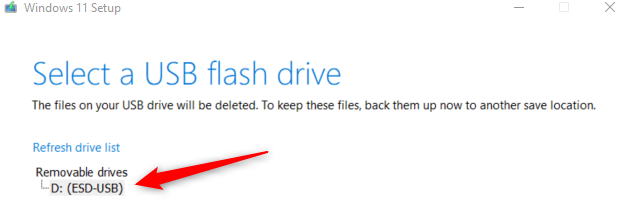
STEP 7: Select USB drive
Select your USB drive from the list of detachable devices. Then click Next.
As mentioned earlier, it is important that your USB drive is empty. If there are files on it, this process will automatically delete them!
STEP 8: Wait for the download

STEP 9: Complete
You are ready now to install Windows 11 on your computer. Here are the steps for installing with your USB flash drive.
Installation
STEP 1: Turn off the computer and connect the USB drive
This should cause the installation to start automatically and you can then proceed to Step 2. If this does not happen, do the following to tell your computer to boot from your USB flash drive:
- Start the computer and immediately press DELETE, F2, F8 or F1. You should click several times to reach the motherboard's settings, called BIOS. You should be told which button to click once the computer starts to take you to the BIOS.
- In BIOS, look up Boot Priority or Boot Order. You should find this in the Settings menu.
- Now click on Boot Option #1 and choose to boot your computer from your USB stick.
- Shut down BIOS and reboot by selecting Exit and Save Settings.
STEP 2: Choose language, time and currency format

STEP 3: Enter the product key

STEP 4: Choose operating system

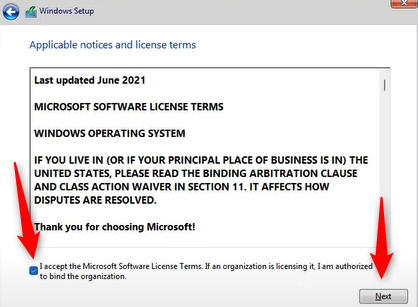
STEP 5: Accept license terms
Now you have to accept the license terms by ticking the option I accept the license terms. Then click Next.
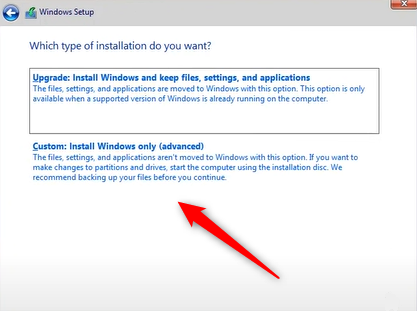
STEP 6: Select installation
Choose the type of installation you want to perform. If it's a new installation, choose Custom: Install Windows Advanced only.
STEP 7: Choose hard drive
Choose an empty hard drive to install Windows 11 on. Click Next to start the installation.
